News
Dip hopping May 27 2021, 0 Comments
With each passing day, it seems that there is another new type of hop to experiment with. And it also seems with each passing day, there's a new way to utilize these hops!
You've probably heard of mash hopping, first wort hopping, adding hops in the boil, dry hopping, double dry hopping, adding hops during active fermentation, whirlpool hopping, etc. But have you heard of "dip hopping?" This is a new one for me.
Dip hopping is a method that helps accentuate pleasant hop aromas while suppressing hop off-flavors. First experimented with by brewers at the Kirin brewery in Japan, dip hopping follows these general steps:
- Running at least a portion of the wort from the kettle into the fermenter
- Partially or completely cooling it
- Adding hops prior to fermentation (but leaving the hops in)
There are may different ways you can experiment with dip hopping, including:
- Running more or less of the wort into the fermenter
- Cooling the wort down to different temperatures to attempt to bring out different characteristics
- Letting the hop tea created by the dip hopping sit for longer or shorter times before adding the rest of the wort
- Use different hops and hop amounts in the dip hopping stage
Brewers who have experimented with dip hopping have reported beers that are super aromatic, like a west-coast IPA, but without the onion and garlic aromas.
A good place to start perhaps would be to pull about 3/4 of a gallon of wort from your kettle into the fermenter about half way through your boil, cool it down to 170F, and add your dip hops (maybe 30% of the hop bill?). Finish the rest of your boil, add the rest of the wort to the fermenter, and away you go.
Happy hopping!
Gluten-Free Hazy IPA May 19 2021, 0 Comments
I'm out of hoppy beers at home, so it's time to brew another hop bomb. Up next, my first hazy IPA, which I'm calling Sultan of Penryn. Brewed with Sultana (Denali) hops and Verdant IPA yeast (from a brewery in Penryn, Cornwall), it's not my most creative name ever, but I guess it's an improvement from my previous beer, which was affectionately called Munich Dunkel...
I'm trying out a few new things this batch, including:
- Flaked quinoa - Hoping this will add some body, head retention, haze, and nutty sweetness to the beer.
- Flaked oats - I've used flaked oats in the past, but it was when I was brewing gluten-full beer. I got some GF rolled oats from the store. I'm hoping to get a little conversion because of the enzymes, but I'm not totally sure how these will contribute to the beer.
- Sultana hops - I'm really looking for a pineapple character from the hops, and the research pointed to this hop.
- Verdant IPA - Never tried this yeast, but from what I've heard, this'll make a solid IPA that will stay hazy.
- Shorter mash - I've been doing 90-120 minute mashes and getting really fermentable worts. I'm going to shorten this to 75 minutes to see if I get a little more body, head retention, and a touch of residual sweetness.
The Recipe
- 7lb Pale Millet Malt
- 4lb Pale Rice Malt
- 2lb Flaked Oats
- 2lb Flaked Quinoa
- 1lb Biscuit Rice Malt
- 2lb Rice Hulls
- 2oz Azacca Hops (whirlpool)
- 3oz Sultana (Denali) (whirlpool)
- 3oz Azacca Hops (dry hop)
- 5oz Sultana (Denali) dry hop)
- 1 pack Verdant IPA dry yeast
- 1 tsp Wyeast Beer Nutrient (10 min)
- 20g Ondea Pro brewing enzymes (mash)
- 15g Ceremix Flex brewing enzymes (mash)
- Phosphoric Acid (1 tsp mash, 1/2 tsp sparge)
- 3 gallons reverse osmosis water
The Mash
I added 1 tsp. Phosphoric Acid to the mash to lower the pH a bit.
This was one of the smoothest mashes I've done. Nailed my target temperature of 162, mashed for 75 minutes, sparged at 170-175, and hit the pre-boil target volume of 7.5 gallons right on the dot.
Pre-boil gravity was 1.053, which should translate into a post-boil gravity in the low 1.06x range, which is exactly what I was going for. Not much else to say, sometimes boring is good!
The Boil
One of the easier boils I'll ever do. The only addition during the boil was yeast nutrient at 10 minutes. I skipped the kettle finings because I want this beer to be hazy anyways.
I added the whirlpool hops right away after turning the heat off and got a good recirculation going. After 10 minutes, I turned off the pump and let everything settle for 10 minutes. Then I put the chiller in and cooled the beer down to 65F.
Next!
Post Boil
Fermentation was uneventful, dry-hopped with a ton of hops, cold crashed the beer, and threw it into the keg.
A couple things that stood out at kegging time was how murky the beer was. It really looked like some milk had been added. I think I underestimated the amount of protein in the quinoa. So not the most visibly attractive beer, although I think most hazy IPAs look pretty gross anyways.
Second, the hop burn was very pronounced. I had done a lot of reading about hop burn and hazy IPAs, and I was somewhat confident that I had not overdone the hopping schedule (compared to a lot of other recipes and articles I had read). I'm not so confident about that now :(
Final Verdict
I'll give this beer a little more time in the keg, but it may be my first gluten-free dumper. The hop burn is just not dissipating enough to make this beverage pleasant to drink. I'll check it in another month or so, when I may need an empty keg, but I think I definitely learned my lesson regarding the hop schedule / choice.
Disappointing, but I guess if every batch was perfect, the hobby wouldn't be as fun. Ok, that may not be true, but it's what I'm telling myself right now...
Lessons Learned
- Time to start really digging into water chemistry! This the next frontier I really would like to add to the brewing process. I have a general understanding of water chemistry, but I would like to take it up a notch or two...
- I need a new hose. It's basically a coiled up kink. Early birthday present for me!
- I can get away with a LOT less quinoa. So much protein!
- The hop schedule was pretty ridiculous and made the beer just about undrinkable. If I try to make a hazy again, probably cut it by a good 30% and concentrate on hops with really high oil content.
Up next is another Sabro Cream Ale!
Gluten-Free Munich Dunkel April 19 2021, 0 Comments
Munich Dunkel was my gateway beer. It's a fun story.
A dear friend of mine and I traveled around Europe after college. In Munich, Germany, we visited a beer garden that was just perfect. There were families sitting around picnic tables, miniature golf for the kids, a jazz band was playing, and was BBQ being smoked.
Anyhow, there was also beer. Up until that point probably the best beer I had ever had was Miller High Life. Yes, I lived a sheltered life. Also, we didn't speak any German. So we went up and ordered two different kinds of beer. They poured them and brought them over to us. One was light, like a pilsner, and one was dark. Both my friend and I looked at the dark beer thinking, "Oh no, I don't want to drink that one." We each took a sip.
I know that a light bulb didn't literally appear over my head, but it sure felt like it. It was delicious! Malty, sweet, I thought to myself "Aha, THIS is why people have been brewing beer for thousands of years!"
I told my buddy, "You can have the lighter one, I'll drink the dark one." Scott replied "That's ok, you can have the light one if you want." "You like it too!" I exclaimed. I later found out that the dark beer was a Munich Dunkel. And the course of my life was forever changed...
The Recipe
- 11.75lb Goldfinch Millet Malt
- 4oz Black Pitch Rice Malt
- 4oz Medium Biscuit Rice Malt
- 2.5lb Rice Hulls
- 2oz Hallertau Hops (60min)
- 1oz Hersbrucker Hops (20min)
- 2 packs Saflager w-34/70 dry yeast
- 1 tsp Wyeast Beer Nutrient (10 min)
- 1 Whirlfloc tablet (10 min)
- 15g Ondea Pro brewing enzymes (mash)
- 10g Ceremix Flex brewing enzymes (mash)
- Dash of Phosphoric Acid in sparge water
- 9 gallons reverse osmosis water
- Monstera water treatment
- 1lb D-90 Belgian Candi Syrup
The Mash
Well, my last few brews went off without a single hitch. Today, it seemed, the universe wanted to balance the accounts.
I got an early start, since I was also smoking a chuck roast in the Weber Smokey Mountain smoker. It was not terribly cold (25F), but we had just gotten a lot of snow, so there were big snow drifts to work around.
I started milling the grain, and about half-way through, I noticed that my drill was having a real hard time. When it started to smoke, I figured it was time to give it a break. I also noticed that that set screw in my mill had come loose, so the rollers were not parallel (probably why the drill was having such a tough time).
After lots of fussing, it became quite apparent that I was going to do no more milling this day. Since a good portion of the grain was not fully cracked, I knew my gravity would be quite low. To compensate, I decided to add a pound of the Belgian Candi sugar (indented above in the recipe). Because my gravity was going to be low, I also decided to remove the Hersbrucker hops (also indented above) to reduce the bitterness / hoppiness a bit.
I was about 7 degrees below my target mash temperature (156F vs 163F) because of the extra time I was wrestling with the mill. Not off to a great start, but could be worse.
One new thing I tried in this batch was the Monstera water treatment. It's a sample from a company that replicates the water chemistry for famous brewing areas of the world. I used a bottle that recreated the water in Goslar, Germany. You use either reverse osmosis water or distilled water, add the bottle that contains salts, minerals, etc., and brew away. Can't wait to taste the results!
The Boil
With the addition of the Belgian Candi Sugar, the gravity was just 3 points lower than target, which was a lot better than I was expecting. The boil went off just fine except for two hitches:
- As I was recirculating the wort to sanitize the tubing coming out of the kettle, the tubing became dislodged and started spraying wort everywhere but the boil kettle. I was able to shut off the pump pretty quickly, but I did lose some volume. And thankfully did not lose any skin!
- I've been trying to add a second wort chiller in the kettle to make the cooling more efficient. This has led to pretty crappy whirlpooling action. In the pilsner (last batch), too much of the trub made it into the fermenter. With this batch, I was able to shut off the flow before the trub really started dumping in, but it also meant I lost some more volume in the kettle.
As mentioned earlier, I skipped the 20 minute Hersbrucker hop addition so as to keep the balance of the beer slightly on the malty side.
Post Boil
Because of the cold ground water, i was able to cool the wort down to around 50F. The ambient temperature in the basement is F. Fermentation kicked off in about 24 hours and smelled good and yeasty.
After 14 days, fermentation was just about done, so I brought the beer upstairs to where it was about 63F for a diacetyl rest. After 4 days, I cold crashed the beer, kegged it, and lagered it for 6 weeks.
Final Verdict
This is an interesting verdict. On one hand, the beer is a disappointment, while on the other hand, it's not. I'll explain.
First, the disappointment. While it looks like and slightly smells like a Munich Dunkel, this beer doesn't really taste like one. It has a fairly strong cherry notes in it. It's not an ester character, so it's not from fermentation. And it's not a cherry pie character that you may get from an infection. My first thought is it was from the Belgian candi sugar I added. But after an early preview of the Oktoberfest I brewed (a future blog post), it's from the Goldfinch malt.
Now, the "it's not." The beer tastes good. It's just not what I was intending to brew. But this is also a little bit of a lightbulb moment for me. While some styles can be imitated using GF ingredients, I think some flavors are hard to get not using barley. And sure, I used Goldfinch malt rather than Munich malt, but the Munich millet malt I tasted tasted even further away from what I remember barley Munich malt tasting like.
So I think I'll be taking the brewing in a little bit of a different direction. Up until this point, I had basically been trying to make as close to barley beer as possible without using barley beer. I think I've discovered that perhaps the better route to take is to just figure out what flavors you can generate using the ingredients you have, ie, brew less to style and more to flavor.
It'll be challenging, but I think a fun challenge.
Lessons Learned
- I need a more powerful drill! Either that or I need to build a dedicated mill setup with a different type of motor.
- I need a clip to hold the hose on my boil kettle for when I'm recirculating. If I wasn't right on it, I could have lost the entire batch in a minute or three.
- I need to figure out either a better way to whirlpool with both chillers in the kettle or a different way to utilize the second chiller (soak in an ice bath and run water through it on the way to the other chiller in the kettle, for instance).
- Gluten-free beer can be pretty great, but to maximize potential and flavor, it needs to be its own thing. While some styles / grains match well to barley beers, it can also have the freedom to be its own thing.
Up next is a hazy IPA, this time loaded down with Sultana (Denali) and Azacca hops!
Gluten-Free Frankenstein Porter w/ Oak January 21 2021, 0 Comments
I've made 6 batches so far (I think). It's been a ton of fun and I've learned a lot. One thing I haven't tried yet is a dark beer. And since we're going into not just winter but pandemic winter, I better have some dark beer on hand to get me through those short days and long nights.
Another reason I'm making a dark beer is that it makes a good Frankenstein Beer. At some point, most every homebrewer has made one of these. It was a yearly occurrence for me when I was making glutenous brews. You've got a fairly random assortment of ingredients, a few ounces of this, a couple ounces of that, laying around. Not enough to feature in a beer, but too much to toss.
So you make a Frankenstein Beer. With me, it usually ends up being a porter. I was given a bunch of small sample packets of a wide variety of gluten-free malts. And while I didn't throw ALL of them in this brew, I did throw quite a few in. And keeping with the theme, I had just a smidge of whiskey and a smaller smidge left of dark rum, so I soaked a couple of oak staves from an Old Sugar Distillery barrel and will toss them into the secondary fermenter.
The Recipe
- 8lb White Pale Millet Malt from Grouse Malting Co
- 1.5lb Crystal Rice Malt
- 1.3lb Light Biscuit Rice Malt
- 8oz Munich Millet Malt
- 8oz Chocolate Millet Malt
- 7oz Gas Hog Rice Malt
- 4oz James Brown Rice Malt
- 4oz Crystal Rice Malt
- 4oz Biscuit Rice Malt
- 3oz Dark Rice Malt
- 2lb Rice Hulls
- 1lb D-180 Belgian Candi Syrup (Boil)
- 1/2lb Maltodextrin (10 min)
- .65oz Magnum Hops Hops (60min)
- 1oz Wisconsin grown Cascade Hops (flame out)
- Lallemand London ESB dry yeast
- 1 tsp Wyeast Beer Nutrient (10 min)
- 1 tsp Irish Moss (10 min)
- 1/2 Campden Tablet (pre-mash)
- 15g Ondea Pro brewing enzymes (mash)
- 10g Ceremix Flex brewing enzymes (mash)
The Mash
I'm experimenting with my process a bit to see if I can bring out a bit more body without losing efficiency in the process. But I also don't want to change too much at once, so I know which changes are making the difference. So this time I increased my mash temperature to 165 and decreased the amount of enzymes I used by about half. Next time I think I'm going to try a step mash and fly sparge instead of batch sparge. But for this batch, it's a single infusion mash with a batch sparge at 175F.
This will be a theme throughout this post, but the mash went perfectly. Hit the mash temp right on the nose, after 90 minutes everything was converted, hit my volumes just right, and the wort heading into the boil kettle was quite clear.
The Boil
My volume was dead on coming out of the mash, so I didn't have to audible anything on this one. Pretty simple boil, 60 minutes, some hops right at the beginning, some additives at 10 minutes, and some hops at flame out. It went great. Seriously, I don't remember the last time I had a brew day go this smoothly.
After chilling the brew down, I filled my fermenter with exactly 5.5 gallons and had a gravity of 1.064. Since the target was 1.063, I'll take it!
Maybe I just have to smoke some burnt ends every time I brew. Those were delicious too :)
Post Boil
This is the first time I've fermented with the London ESB dry ale yeast. I've read that it is a quick fermenter and leaves a little bit of sweetness and body behind. Both of these turned out to be correct.
After 5 days, fermentation was completely finished, even though the fermentation temperature was a little low, around 65F. And the gravity was 1.023. And the beer tasted really nice. Definitely has a roasty character. And there is a little residual sweetness, but once it's cooled down and carbonated, I think it'll be just right.
After a week, I transferred the beer to a 5 gallon carboy and added 2 oak staves made from Old Sugar Distillery whiskey barrels that had been soaked in whiskey and dark rum. I went ahead and added the booze as well, it was only a couple ounces. I left it in the secondary fermenter for 2 weeks on the oak and then kegged up the batch.
Two days before kegging, I added some Super-Kleer finings. I had read that beer fermented with London ESB dry yeast can end up looking pretty turbid, and after three weeks in the fermenter, it definitely did.
Final Verdict
Even though I'm a hop head through and through, this is a really nice beer. Pours with a solid, thick head, the beer is dark but when held up to the light is a brilliant amber-reddish color, has a nice body, is malty but not cloyingly sweet, pleasant roasty and chocolate characters, some raisiny flavors, a hint of oak and booze, just a good winter brew.
If I would change anything, I think I would want a little more roast / chocolate / coffee / burnt character in there. Just to make it a little more "portery." But a real fine beer overall.
Lessons Learned
- Keeping good notes is so important. Each brew session has gone more smoothly than the previous one, and I think a lot of it is really taking note of what works, what doesn't, how much liquid is left in a vessel, etc. Tracking all of this information allows you to keep tweaking your processes and what assumptions you use in your brewing software (I use BeerSmith) and recipes.
- I need to plan for more time in the fermenter when using oak. While I didn't want this beer to taste like a tree, the two weeks on the oak staves was not enough. Next time I think I'll try and double it.
Up next is either a light lager or yet another IPA, this time loaded down with Sultana (Denali) and Azacca hops!
Gluten-Free Palate Blaster West-Coast IPA December 08 2020, 2 Comments
I've been craving a West-Coast style IPA for a real long time. I wanted to wait until I could cold crash the hops out in my chest freezer to brew one, because I've had issues getting the dry hops to settle out. And I plan to dry hop the heck out of this beer.
I'm looking for a pretty standard West-Coast IPA profile. Dry, some fruit, some floral, lots of dank, lots of pine, eminently drinkable.
The new thing I'm trying out with this beer is a nifty (hopefully) airlock system for when I cold-crash the beer. I would really like to avoid sucking air (and whatever is in the airlock) back into the fermenter as everything cools down and contracts in the fermenter.
To accomplish this, I built this contraption. And yes, for you naughty people out there (unless you live in Washington, Illinois, Oregon or any of the other lucky states), it does look quite like a bong.

The idea behind it is that it collects CO2 during fermentation, and then when everything goes into the chest freezer, the fermenter will suck CO2 back in instead of air and any liquid. Fingers crossed :)
My brew day ended up being pretty chilly and windy, which added a few challenges, but nothing that couldn't be overcome. Here's how it went down.
The Recipe
- 11lb White Pale Millet Malt from Colorado Malting Co
- 1lb Light Munich Millet Malt from Colorado Malting Co
- 1lb Rice Malt from Grouse Malting Co
- 2.5lb Rice Hulls
- 8oz Maltodextrin (10 min)
- Amarillo Pellet Hops (.25oz 30, .25oz 15, .25oz 5, .25 Whirlpool)
- Amarillo Cryo-Pellet Hops (1oz Dry Hop)
- Tenacious Badger Chinook Pellet Hops (.25oz 30, 1.75oz Whirlpool, 2oz Dry Hop)
- Columbus Pellet Hops (.25oz FWH, .25oz 60, .25oz 50, .25oz Whirlpool, 1oz Dry Hop)
- Simcoe Pellet Hops (.25oz 30, .75 Whirlpool)
- Simcoe Cryo-Pellet Hops (1oz Dry Hop)
- US-05 American Ale dry yeast
- 1 tsp Gypsum (60 min)
- 1 tsp Wyeast Beer Nutrient (10 min)
- 1 tsp Irish Moss (10 min)
- 2 Gallons Reverse Osmosis Water
- 1/2 Campden Tablet (pre-mash)
- 30g Ondea Pro brewing enzymes (mash)
- 20g Ceremix Flex brewing enzymes (mash)
The Mash
I was shooting for a mash temperature of 164F, with the intention of if I was going to miss, miss high, because it was only 25F at the start of brew day. My mash was 167F once everything was stirred in, so I counted that good enough.
I was surprised that after a 90 minute mash, the temperature had only dropped 4 degrees. Here's to insulation!
At the end of the mash, the wort didn't look as clear as it normally does, so I did a starch test to make sure everything was converted. It was negative, so I went ahead and batch sparged.
I drained the mash tun into an intermediary container before moving the wort over to the boil kettle again, which worked like a charm.
I hit the volume of liquid dead on and my measured efficiency was super high again, so I ended up not adding a pound of rice syrup solids I was planning on adding.
The Boil
This was a fun boil, since I had a lot of hop additions to make. I added some First Wort Hops, then hop at 60 minutes, 30 minutes, 15 minutes, 5 minutes, and as I turned off the heat. And boy did it make the wort smell and taste great!
It was quite windy, so I had a little difficulty keeping a consistent boil, so the boil was a little more vigorous at times than I would have liked, which means I ended up boiling off about a 1/2 gallon more than I was hoping for. I did end up topping up with de-chlorinated tap water to hit my volume.
Once I topped off with the water, my gravity was at 1.062, which is a perfect number for an IPA. Can't wait!
Post Boil
I added two packs of US-05 dry yeast to see if I can get fermentation to complete within a week or so. Also, it's a little cool where I'm fermenting, around 64F. I would like fermentation to be basically done when I transfer this IPA to a secondary to dry hop. There was a tiny action in the airlock contraption the first night, and it started rolling pretty good by the 24 hour mark.
By day 9, my gravity was down to 1.012, so I decided to move to the secondary and add the dry hops. All 5 ounces of them. I didn't take a gravity reading because I was still seeing action in the airlock.
By day 14, it was time to throw the carboy into the fridge and cold crash. I did see some back-pressure action, but I'm pretty confident that the airlock / bong system worked as intended.
Final Verdict
My first impression was that this beer wasn't very good. I got a weird, earthy character from the hops I wasn't expecting. After some research, I found that sometimes Columbus can perceive that way in certain instances. But as the beer aged, that character mostly mellowed out into a nice West-Coast IPA with a bracing bitterness, exactly what I was hoping for.
The final gravity was 1.010, so it dried out pretty nicely. Overall, I'm really happy with this beer. The only issue after a few days in the keg was that I over-carbonated it, but that's an issue pretty easily fixed in a keg, just unhook it and keep pulling the pressure relief valve.
Lessons Learned
- Taking post-mash / pre-boil gravity readings is a must. By doing so, I realized that I didn't need to boost the gravity with a pound of rice syrup solids.
- The orange cooler did an amazing job of holding heat, even in the cold weather. Which means I'll be doing more winter brewing than I thought I would be able to do this year :)
- It's a good idea to completely take apart the equipment, including fittings, every few brews, if not more often. I took apart the fittings after this brew and found some stickiness in a place or two where I wouldn't have thought wort would be able to get. Cleanliness is next to godliness!
- 48 hours at 45psi is too long / too high to carbonate!
Up next is my first gluten-free porter, to which I may add some oak staves!
Gluten-Free Sabro Cream Ale November 13 2020, 2 Comments
I've made a few hoppy beers in a row, so I figured it was time to change it up. Inspired by a cream ale conceived of by Clint Lohman, head brewer at Working Draft Beer Company, I wanted to make a gluten-free cream ale. The beer in question was made with 50% barley base malt, 50% rice, Sabro hops, and Kolsch yeast. The combination gave it a complex, delicious coconut, almost pina colada-esque character (or so I've been told).
I've wanted to try that beer for a long time, so now I'll just make my own gluten-free version :)
The Recipe
- 5lb White Pale Millet Malt from Colorado Malting Co
- 1.5lb Rice Hulls
- 4lb Brown Rice Syrup (Boil)
- 1lb Maltodextrin (10 min)
- 1oz Sabro Hops (whirlpool)
- 2oz Sabro Hops (dry hop)
- Lallemand Koln Kolsch-style dry yeast
- 1 tsp Wyeast Beer Nutrient (10 min)
- 1 tsp Irish Moss (10 min)
- 3 Gallons Reverse Osmosis Water
- 1/2 Campden Tablet (pre-mash)
- 13g Ondea Pro brewing enzymes (mash)
- 10g Ceremix Flex brewing enzymes (mash)
The Mash
The mash went pretty well. Nailed my mash temperature of 163F, and after 90 minutes, the starches had been converted. The only issue was that because it was such a small, shallow grain bed, more bits of grain got through the false bottom than I would have liked.
To counter this, I drained the mash tun into an intermediary container before moving the wort over to the boil kettle. This worked so well that I think I'll do it with the next batch (and probably the following batches as well).
Measured mash efficiency was around 75%, so still getting solid and consistent mashes.
The Boil
I had to extend the boil a little bit because the initial boil volume was a little higher than I was shooting for. I think this was partially, but not completely, due to me not taking into account the 4lb of rice syrup.
As a quick aside, I tried out the rice syrup instead of using rice malt for a few reasons. First, I had never tried it before and Alt Brewing, Madison's awesome, local gluten-free brewery (which just won a silver medal at the Great American Beer Festival, congrats!) has had some great success utilizing this. Second, rice syrup is cheaper than rice malt. And finally, I didn't have any rice malt :)
The boil went almost perfectly. I mis-judged how much longer I should boil the wort to reduce the volume. I increased the boil from 60 minutes to 80 minutes, which was about 10 minutes too long. Which means I went into the fermenter with about 5 gallons instead of 5.5 gallons, give or take.
Not the end of the world by any means, but my starting gravity ended up being 1.058 instead of the 1.044 I was shooting for. Again, not the end of the world, but this beer won't quite be the have two or three pints session beer I was hoping for...
Post Boil
I was a little worried that the dry Kolsch yeast took almost 30 hours to really take off, but once it got going, it chugged along steadily for about 12 days. On day 12, I took a gravity reading, 1.014. Since I was getting impatient (I mean, come on, I wanted to try out my new kegerator!), I decided to dry hop directly in the primary and added 2oz of Sabro hops to the primary fermenter, purging the oxygen after adding the hops.
And since I was FINALLY able to procure a chest freezer and make a keezer, after 4 days of dry-hopping, I was able to cold crash the batch. And for the first time ever, to aid in clarity, I added isinglass when I cold-crashed the beer. Three days later, I racked the clarified beer into a keg, hooked it up to CO2, cranked the pressure up to 35psi, and patiently waited two days.
Final Verdict
Damn, this beer turned out great. Really smooth mouth-feel, dry but with a slight malty sweetness, and a wonderful, complex coconut character from the Sabro hops. I get a better head on this beer than the other beers I've brewed so far. This beer won't last in the keg too long, because I find myself going back again and again to the tap because it goes down too easy.
Definitely the best GF beer I've brewed. Woot!
Lessons Learned
- Using the intermediary vessel in-between the mash tun and boil kettle worked great in keeping chunks out of the boil kettle.
- I didn't really see much difference in clarity with the Isinglass. I think the little hazy I'm seeing in the beer may be due to not cooling the wort down fast enough. A project for the winter!
- The TapCooler counter pressure bottle filler ROCKS! Super easy to use, super easy to clean, I won't use anything else to bottle beer out of a keg.
Up next is a palate blasting West-Coast IPA hop bomb!
Gluten-Free Mosaic Pale Ale October 19 2020, 0 Comments
It's the summer, so I have to keep on my hop-themed journey with this batch. I've made three different IPAs, so it's time to try something else. How about a pale ale? How about a Mosaic Pale Ale?
I'm really enjoyed the process with and the character from Cryo hops, so most of the hops I'll be using in this batch will be Cryo hops. I'm also going to see what adding a pound of rice syrup solids does for the fermentation.
The Recipe
- 8.5lb White Pale Millet Malt from Colorado Malting Co
- .5lb Munich Millet Malt
- .5lb Crystal 60L Millet Malt
- .5lb Abbey Millet Malt
- 1.5lb Rice Hulls
- 1lb Maltodextrin (10 min)
- 1lb Rice Syrup Solids (10 min)
- 1oz Mosaic pellet hops (.1oz FWH, .9oz 10 min)
- 1oz Mosaic Cryo Hops (whirlpool)
- 2oz Mosaic Cryo Hops (dry hop)
- Lallemand Kveik dry yeast
- 1 Cup Corn Sugar (bottling)
- 1/2 tsp Wyeast Beer Nutrient (10 min)
- 1 tsp Irish Moss (10 min)
- 1 tsp Gypsum (60 min)
- 3 Gallons Reverse Osmosis Water
- 1/2 Campden Tablet (pre-mash)
- 25g Ondea Pro brewing enzymes (mash)
- 19g Ceremix Flex brewing enzymes (mash)
The Mash
The mash went almost perfectly. Was shooting for 163F, hit 165F, so left that alone, see how it goes. After 90 minutes, starch was definitely converted, so moved onto the vorlauf / lauter stage.
Due to the find grind, the pump did clog with grain at the beginning of the second runnings. I'm considering using a nylon straining bag inside the mash tun if this happens again.
Measured mash efficiency was above 75%, so again, pretty excited about that.
The Boil
This batch was my first foray (at least in gluten-free brewing) into First Wort Hopping. FWH is when you add hops to your kettle just as you are filling up the boil kettle from the mash tun. It adds bitterness and a distinct flavor. Of course .1oz is not a whole lot, but hopefully this adds another layer of hoppiness to this brew.
I went into the boil kettle with the perfect volume (7.5 gallons). I did a less vigorous boil than with previous batches, hoping to not boil off so much volume. And it worked like a charm! I went into the fermenter with a volume of 5.5 gallons, which is what I was hoping for.
Even though I hit the exact volume I was looking for, my gravity was 10 points higher than I was anticipating, 1.054 vs. 1.044.
Now we just have to make sure it tastes good :)
Post Boil
Just like the previous batch, the Kveik yeast rocked out like a champ, completing fermentation within 4 days.
In an effort to enhance clarity and hop character, I tried 2-stage fermentation with this batch. After a week, I transferred the beer to a 5 gallon glass carboy (purging the oxygen with CO2) and dry-hopped with 2oz of Mosaic Cryo hops.
Final Verdict
I think this is my favorite batch as of yet. It cleared up pretty well for a hoppy beer, had a little bit of a head on it which lingered a bit, and still had some body to it, even though it finished around 1.010.
But the most important aspect, I think we all would agree, is the taste. This batch had a real pleasant balance between malty and bitter. Next time I may up the bitterness level a tad in a pale ale, but this is pretty dialed in.
The hop flavor definitely comes through better than in previous batches, even though I used fewer of them, which tells me the extra steps of purging the fermenter with CO2 and transferring into a secondary fermenter really had an effect. Lots of berry and stone fruitiness, some pine and dank, everything you'd want and expect from a Mosaic Pale Ale!
Lessons Learned
- Adjust overall efficiency up in BeerSmith
- Shorter mash 90 min vs 120 min did not affect overall efficiency
- Keep purging fermenter with CO2 when transferring / dry hopping
- Include malto-dextrin in the recipe, adds a bit of body without affecting too much else.
Up next is a cream ale inspired by Working Draft Beer Co's Rice Cream Treat Ale!
Brew #3 - Hibiscus Saison August 21 2020, 0 Comments
While my GF brewing is going to be pretty hop heavy (see below for a picture of what my left arm looks like), it's summer, so I wanted to make something that would be refreshing and also take advantage of the higher fermentation temperatures. Hibiscus saison here I come!
The Recipe
- 9lb White Pale Millet Malt from Colorado Malting Co (the first two batches used Red Millet from Grouse Malting)
- 1lb Vienna Millet Malt
- 1.25lb Rice Hulls
- 1.33lb Corn Sugar
- 1oz Target pellet hops (60 min)
- 1oz Nelson Sauvin pellet hops (dry hop)
- 2.5oz Dried Hibiscus Flowers (1.5oz flameout, 1oz dry hop)
- Belle Saison dry yeast
- 1 Cup Corn Sugar (bottling)
- 1/2 tsp Wyeast Beer Nutrient (10 min)
- 1 tsp Irish Moss (10 min)
- 1/2 Campden Tablet (pre-mash)
- 3 gallons Reverse Osmosis Water
- 16g Ondea Pro brewing enzymes (mash)
- 11g Ceremix Flex brewing enzymes (mash)
The Mash
The mash went great. I ended up adding a little extra water to the mash, since it seemed pretty thick. So instead of sparging with 4.75 gallons, I sparged with 3.25 gallons.
After about 90 minutes, I checked on the mash, and it looked a little goopier (more starch) than the last batch. Could be due to the new base malt. i did a starch conversion test, and it said there was no starch present, so just in case I let it go another 30 minutes before batch sparging.
The sparge went great, got fewer chunks into the boil kettle, which is nice.
The Boil
Boil was perfect except for one, ahem, not-so-smart move on my part. When adding the sugar, I turned off the heat, got distracted for a couple minutes, and then opened the bag and started pouring in the sugar. Too fast. Which led to a big foam up / boil over. Lost .5 gallons, which is a bummer, but not the end of the world.
Added 1.5 oz of hibiscus at flame out. Beer going into the fermenter had a slight pinkish hue, hoping for more color with the addition of 1 oz hibiscus in the fermenter.
Post Boil
Because of the boil over, I went into the fermenter with 4.75 gallons. Which means that BeerSmith volumes seems to be dialed in pretty well. Ended up with a 1.054 starting gravity, which is just slightly above the 1.050 target gravity.
After I cooled the beer down (which took a long time due to warm summer ground water), I pitched the Belle Saison yeast and stuck the fermenter in my bedroom closet to take advantage of some 80+ degree fermentation conditions. The Belle Saison went nuts!
Final Verdict
First thing that jumps out is the beautiful color. A pink / reddish hue, and it cleared up pretty nicely. Has a really inviting floral, berry-like aroma. Definitely some spicy notes from the saison yeast in the nose as well.
This beer is fruity, floral, dry, and refreshing. It ought to be dry, the final gravity was .998! I've never had a beer ferment down that low, crazy! It's really tasty. Because of the acid that the hibiscus is treated with to help it keep its color, there is a tiny bit of a harsh aftertaste. But hopefully that will dissipate with time.
All in all, I'm really happy with this beer. I think I would back off on the bittering hops a bit next time to compensate for the tartness from the hibiscus. Maybe add a little maltodextrin to improve head retention. But other than that, I would definitely make this brew again!
Lessons Learned
- I think this was a tad bit too much hibiscus, but not by much. Has a nice, acidic, floral character.
- Still looking for ways to get more body. Next I'll try adding maltodextrin.
- But the beer tastes cleaner, so I think the processes are getting better!
Gluten-Free Brew Day #2 June 25 2020, 0 Comments
So after making a decent but not great IPA, I decided to give the Jonesin' for Buck EyePA another try. I switched up a few things but kept a lot of the process similar (changes highlighted below)
The Recipe
- 13lb Pale Millet Malt (up from 12lb)
- 2lb Munich Millet Malt
- 2lb Goldfinch Millet Malt
- 1lb Medium Crystal Millet Malt (was 2lb)
- 1lb Light Crystal Millet Malt
- 1lb Rice Hulls
- 2 oz Columbus (1 @ 60, 1 dry hop)
- 2 oz Azacca (1 whirlpool, 1 dry hop)
- 2 oz Mosaic (1 whirlpool, 1 dry hop)
- 2 oz Chinook (1 whirlpool, 1 dry hop)
- US-05 Dry American Ale Yeast
- 1 cup corn sugar (bottle conditioning)
- 1 tsp Irish Moss (@ 10)
- 1/2 tsp Wyeast Yeast Nutrient (@ 10)
- 1/2 tsp Gypsum (@ 60)
- 3 Gallons Reverse Osmosis Water (Rest Tapwater)
- 1/2 Campden Tablet (20 min before heating water)
- Brewing enzymes
The big change from batch one to batch two is the usage of brewing enzymes. I am adding some enzymes to help with the efficiency with the mash. The last batch was give or take 50% efficiency, so we're hoping for a bit higher with the enzyme usage.
One other change is that instead of digging around the internet for a bunch of different free brewing calculators, I'm using Beersmith for the first time (this will be relevant later).
As for the flavor profile of this beer, I'm still looking for a very hop-forward beer, big but not overwhelming bitterness, and lots of fruit, pine, and dank flavors and aromas.
The Mash
The mash went great! Sort of. Here's a quick breakdown of the mash specifics:
- 90 minute mash
- Mashed in with 7.75 gallons of H2O at 162, was 158 by the end of the mash
- Batch sparged with 3.5 gallons of H2O at 170
- Pre-boil gravity of 1.051 (1.048 anticipated)
- Pre-boil volume of 7.75 gallons (7.25 anticipated)
The great part of the mash was the enzymes! When I opened up the mash tun, I could just tell that the starches had been converted. The wort looked like the countless of other brews I've done over the years. A definite change in appearance. And the yield was much higher. I think I went from a 50% efficiency to a 70% efficiency, which is great!
The not so great part of the mash is that I can't read. Like I mentioned earlier, this is the first time I was using Beersmith. When determining how much mash water to use, I accidentally looked at the "Mash Volume Needed" field instead of the "Tot Mash Water" field. Which means I had an extra 1.5 gallons of water in there. And since I'm only using an 8 gallon kettle, I just went into the kettle with .5 gallon of extra wort and dumped the rest.
The reading error also meant I overshot my mash temperature a little bit, so I had to add some cold water to compensate.
The Boil
As mentioned, I extended the boil by about 30 minutes to compensate for the extra volume. It was probably about 10-15 minutes too long, because I ended up being about 1/2 gallon short of the volume I was shooting for.
I added an ounce of Columbus hops and some gypsum when I started the 60 minute timer and added irish moss and yeast nutrient with 10 minutes left in the boil. The boil went smoothly, no surprises, nice rolling boil the whole time.
Post-Boil
I whirlpooled for 30 minutes, cooling the wort down to about 185F before starting the whirpool and adding an ounce each of Azacca, Mosaic, and Chinook hops. Went into the fermenter with about 4.8 gallons of wort, an original gravity reading of 1.064, and a temperature of 70F.
Lessons Learned
- Learn to read more carefully! If I had just read more carefully, my volumes would have been pretty spot on (I'm guessing)
- Enzymes are you friend. I'll definitely be utilizing the enzymes moving forward. I think the beer will have more body, flavor, and will definitely be more economical.
- Volume measure for boil kettle. I need to create a dip-stick that allows me to check the volume in my boil kettle.
I'll be back in a few weeks to discuss how this batch turned out and what we'll try for brew #3. Happy (gluten-free) homebrewing!
Smoking Side Note
Like I often do when I brew (or have a full day off), I threw some meat on the smoker on brew day #2. I made some beef short ribs. Seasoned them with salt, pepper, and granulated garlic. Smoked them using post oak wood on the Weber Smokey Mountain cooker at ~260F for about 3.5 hours, wrapped them in butcher paper, returned them to the cooker for another 3.5 hours, and then rested them for an hour or so.
They were quite tasty. The fat really rendered down, they had a great bark, but the top layer (away from the bone) was too dry. I should have probably either wrapped earlier or started spritzing with some liquid. But the meat in the middle and by the bone was legit.
Haven't decided what I'll cook on brew day #3, but it'll probably involve some part of a brisket...
Fermentation, Packaging, and Conditioning June 06 2020, 0 Comments
So this ended up being one of my more "interesting" fermentations. It started out great, the US-05 American Ale dry yeast took off after about 18 hours. Fermentation temperature was a steady 66-68F. Fermentation went strong for about four days, slowed down, and the airlock was completely quiet around day six.
Day nine, I added dry hops. A lot of dry hops. 2 oz Centennial, 1 oz Simcoe, and 1 oz Chinook. Gonna be a solid, West Coast-style IPA.
On day 12, things took the turn for the "interesting." I moved my carboy down to my chest freezer to cold crash the beer. It turned on, started making noise, all of the good signs. Except one, which may be the most important part. It wasn't cooling. At all.
After a bit of research, it seemed that my chest freezer was kaput. Oh well, not the end of the world, I'll just buy another one. A cost I would rather do without, but definitely necessary at this point. Only one issue. Due to COVID-19 and everyone stocking up on food, everywhere was out of chest freezers, with none to show up for 6-8 weeks at the earliest.
So, on to plan B, with "B" standing for bottling. On day 15, the beer is still looking pretty cloudy, so I decided to use some Dualfine to help clarify the beer a bit. I gently stirred in the clarifier, hoping to wake up the next morning to clarified beer ready to be bottled.
The next morning, the beer had clarified some, but was a little more "interesting." The airlock was giving off a bubble every 30 or so seconds. Perhaps it is just off-gassing post fermentation. Is what I thought, until the next day the same thing was happening. And the next day.
By now the beer has been on the dry hops for over a week. I was shooting for 4-5 days. I considered moving the beer off of the dry hops (to avoid the beer getting overly grassy or vegetal), but I was worried about too much oxidation, so I left the beer where it was.
On day 18, I had pretty much lost all patience. I mean, I want to drink this brew. Am I wrong? I finally took a gravity reading and got a reading of 1.010, which is a tiny bit below the target final gravity I was shooting for. The beer is still giving off a bubble every 90 seconds or so, but I'm going to risk it. Tasted pretty darn good at bottling...
Two weeks later...
Given all of the firsts that went along with this batch (first brew on the new system, first all-grain gluten-free batch, first brew of the spring), I'm pretty happy with this beer. There isn't nearly as much hop aroma as I was hoping for, and the beer didn't clear up much (Steven called it "muddy"), but I've definitely had worse gluten-full IPAs...
The beer did seem to clarify a little bit the longer it sat in the refrigerator, so hopefully sometime down the road when I can actually purchase a chest freezer, I'll be able to cold crash.
But the beer had a nice but not overwhelming hop bitterness bite, a good amount of fruity hop flavor, a residual dank aroma (from the Columbus), and a balancing malt backbone. I'd rate this batch 3 beers out of six, but it's definitely a 6-pack is half full, rather than half empty :)
Lessons Learned
- Check your equipment before you want to use it, especially if you haven't used it for a long time!
- Take a gravity reading BEFORE you dry hop.
- Just gotta relax, because like Charley K, rock star beersmith at the Wine and Hop Shop says, "It'll be beer," even if everything doesn't go exactly perfectly.
I really was hoping to do a dry hopped lager as batch number two, but without a functioning freezer, I've got to stick to ales for now. I was thinking maybe an Altbier, I really like those, and there is a dry yeast, Safale K-97, that I would like to try with it. But on second thought, I really want another shot at this IPA...
As always, feel free to leave comments, suggestions, critiques, etc. in the comments. Or you can email the Shop as well. Thanks and until the next brew, happy (gluten-free) homebrewing!
Brew Day #1 - American IPA May 18 2020, 0 Comments
I lucked out. Brew day #1 was a beautiful, 60F, sunny day. Not only did I make an IPA, but I had a brisket in the smoker for the first cook of the spring!
I knew my first brew would present some challenges. First time brewing in 2020, first time brewing on my new system, and first time making an all-grain gluten-free batch. That's a lot of firsts! And wouldn't you know it, the brew day did in fact live up to the billing by throwing me a few curveballs. But first, let's talk about the recipe.
The Recipe
After some consultation with my buddy Steven, who used to work at the Shop and now brews at Alt Brewing, Madison's dynamite GF brewery, here's what I came up with for a recipe:
- 10 lb Pale Millet Malt - Looking for a base to add gravity, some body, sweetness, and color
- 2 lb Munich Millet Malt - Looking for a bready, toasty, malty flavor
- 2 lb Goldfinch Millet Malt - Looking for a toasty and caramel flavor
- 1.5 lb Crystal 50L Millet Malt - Looking for some sweetness, body, and mouthfeel
- 2 lb Rice Hulls - Used to prevent stuck sparge
- 2 lb Rice Syrup Solids (in boil) - Looking for increased starting gravity
- 2 oz Chinook pellets (.9 oz @ 60 min, .1 oz in whirlpool, 1 oz dry hop)
- 1 oz Simcoe pellets (whirlpool)
- 2 oz Amarillo pellets (1 oz whirlpool, 1 oz dry hop)
- 1 oz Columbus pellets (whirlpool)
- 2 oz Centennial (dry hop)
- US-05 dry yeast
- 1/2 tsp Wyeast Beer Yeast Nutrient (@ 10 min)
- 1 tsp Irish Moss (@ 10 min)
Madison has pretty hard water, so i made the following adjustments to my brewing water:
- 67% tap water, 33% reverse osmosis water
- Used 1/2 campden tablet to de-chlorinate the tap water
- Added 1/2 tsp amylase enzyme to mash to increase conversion
- Added 1/2 tsp gypsum to the boil to help accentuate hop bitterness
The Mash
I was shooting for a 90 minute mash at 161F. I used an online calculator to calculate my strike water temperature. This is where my brew day first started to stray from the plan. Which is funny, because it was pretty much the first part of the brew day :)
After filling up my mash tun with 180F water and then stirring in my grain, my mash temp was a full 10F below what I was shooting for. So I ended up having to put in around 1.5 gallons of hot water to bring the mash up to 160. Which was actually ok, because my mash would have been much too thick otherwise.
I took a pH reading after mashing for around 10 minutes, and got a reading of 5.1. I was happy with this level, so I did not do any further adjustments (except for the gypsum in the boil).
So after 90 minutes of mashing, I performed a conversion test with iodine. It showed that the starches had been converted (yea!), so it was time to lauter and sparge. I batch sparged at 170F with 3.25 gallons. I had a real difficult time getting the filter bed to set during the sparge, so more grain chunks got transferred over to the boil than I would have cared for. Also, because I didn't want to reduce the amount of sparge water, I went into the boil kettle with an extra gallon or so of wort.
The Boil
Because the initial boil level was high, I lengthened my boil from 60 minutes to about 110 minutes. I got a little more color and more carmelization that I was shooting for, but I think that is a worthwhile trade-off to achieve the gravity I was looking for.
After about 50 minutes, I added 1 lb Rice Syrup Solids and took a refractometer reading and got a gravity of 1.044, which was my target pre-boil gravity, so I started the 60 minutes timer and added .9 oz of Chinook hops. Because I was at my target gravity, I did not add the second pound of Rice Syrup Solids. The boil went about as smoothly as you could ask for. The only real excitement was the fact that I was running out of propane, and probably had about 2 minutes of cook time left when I shut-off the heat. Thanks homebrewing gods!
Post-Boil
I had planned on whirlpooling the hops at 170F for about 25 minutes. However, I was quite surprised how quickly the temperature dropped, especially when I was recirculating. By the time I took a temperature reading, it was down to 155F. So I whirlpooled there for 45 minutes, which means I'll get a little less bitterness, but should retain more of the volatile hops oils.
Once the whirlpool was completed, I cooled the wort down to 70F, filled the fermenter, and added the US-05 dry yeast. I was shooting for going into the fermenter with 5.25 gallons, but only ended up with about 4.5 gallons. My target gravity was 1.056, and the actual gravity was 1.053, so I'm pretty happy with that.
Lessons Learned
Lots! Ok, perhaps I should be a little more specific:
- The millet soaked up more water than I was anticipating. I'll definitely have to put more water in the mash to thin out the mash and maybe remove a little bit from the sparge so I don't go into the kettle with too much volume.
- My temperature calculation for my strike temperature was low, need to get that corrected.
- I'll give batch sparging another try, but I hope to find a better way to have the grain filter bed re-form. Perhaps just a little patience, as the great Axl Rose would say?
- Make sure to check the propane tanks before the brew :)
- I may install a thermometer in the boil kettle to more easily hit the target whirlpool temperature (I plan on making lots of hoppy beer!)
- Create a "dip stick" with volume markers for the boil kettle so readings can be more accurate.
- I was pretty impressed with how powerful the burner was.
- I can't wait to try this beer, it tasted sweet and hoppy going into the fermenter.
- The brisket, while good, could probably have used another 45-60 minutes on the pit.
- My beautiful, sweet, old dog enjoyed her last brew day with her papa. RIP Buck Jones :(
See you next time with a wrap-up of how fermentation, dry hopping, packaging, and consuming went. And I'll preview brew number two! Until then, happy (gluten-free) homebrewing!
Building the Gluten-Free Brewery (at Home) May 06 2020, 2 Comments
My first homebrew rig was just that - a rig. I build supports out of angle iron, had three different burners on it, an attached pump, and it was capable of producing 15 gallons of beer per batch. My efficiency was consistently in the 80s, brew day was fast, cleanup was easy, it was pretty sweet.
However, it was way more brewery than I need right now. 5 gallon batches fits how I want to brew / drink moving forward much better.
But how to get started? What to include? It was a bit of a daunting task, since there are so many different options out there. But an exciting task as well.
Upon thinking about it, what I wanted was to build a quality setup, but I also wanted to build more of an "every person" home brewery. I wanted to make a system that would, in some ways, mimic what customers coming into the Shop would have at home, rather than a small-scale professional brewery.
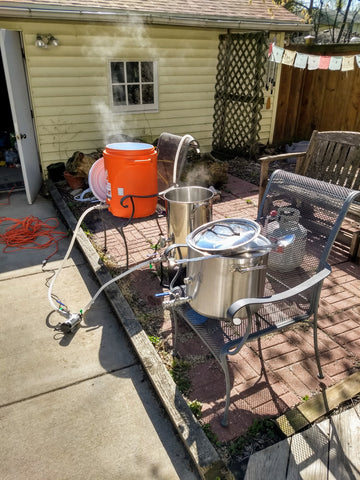
So, here's what I went with:
- Mash tun - 10 gallon cooler with false bottom and weldless spigot (https://wineandhop.com/products/cooler-10-gal-mash-tun?_pos=1&_sid=1c54a7446&_ss=r)
- Boil kettle - 8 gallon heavy duty kettle with spigot and port for thermometer (https://wineandhop.com/products/heavy-duty-8-gallon-kettle-w-ball-valve-and-extra-port-1?_pos=6&_sid=0b3654b4d&_ss=r)
- Hot liquor tank - 8 gallon economy kettle with 2 ports, 1 for a spigot, 1 for thermometer (https://wineandhop.com/products/8-gallon-stainless-steel-kettle-w-2-ports-brewers-best?_pos=5&_sid=0b3654b4d&_ss=r)
- Immersion wort chiller - Standard copper immersion chiller (https://wineandhop.com/products/immersion-chillers-single?_pos=1&_sid=b127afe1b&_ss=r)
- Pump - Economy pump (https://wineandhop.com/collections/kettles-and-accessories/products/mkii-high-temperature-magnetic-pump-keg-king)
- Stainless steel quick connects - Connected to each spigot and tubing that attaches to pump (https://wineandhop.com/collections/kettles-and-accessories/quick-disconnects)
- Burner - Economy jet burner (https://wineandhop.com/products/element-floor-burner-brewers-best?_pos=4&_sid=8e5b84016&_ss=r)
- Glass carboys - Standard glass carboys, already had plenty on-hand :) (https://wineandhop.com/products/6-5-gallon-glass-carboy?_pos=3&_sid=bedc55f89&_ss=r)
I'm sure I'll change up the system as I go along, but this definitely got me excited to get brewing. First batch, an IPA! Until then, happy (gluten-free) homebrewing!
Gluten-Free Brewing: A New Beginning April 27 2020, 0 Comments
My name is Ben, you may know me. I operate the Wine and Hop Shop and am part of the team at Working Draft Beer Co. Beer and beer brewing has been a huge, in some ways defining, part of my life for 15+ years.
What you may not have known about me, is that a few years ago, I started developing strange rashes and digestive issues. What became apparent, much to my chagrin, was that I had developed a sensitivity to gluten.
Over the past couple of years, I've tried lots of things to try and heal my guts to a point that perhaps I could, at least occasionally, drink gluten with minimal to no side effects. Unfortunately, at least for now, abstinence seems to be the only answer that works for me.
I had hopes that Clarity Ferm, an enzyme that White Labs sells that breaks down gluten in beer, would allow me to enjoy glutinous beverages, but alas, while it helped a bit, I still didn't feel well after drinking it, so I had to put that on pause as well.
As you may imagine, this was not an easy thing to come to grips with. Owning a homebrew shop and a brewery, being surrounded by great beer and great beer culture, and not being able to take part in it has been a difficult adjustment.
However, there is a positive light at the end of this tunnel (hence this blog). Steven, who's worked at the Shop for about 1.5 years, recently was hired at Alt Brew to brew their delicious gluten-free beer. Talking with Steven about all-grain gluten-free brewing reignited my desire to make beer.
So I built a new home-brewery (I had given my first rig to Working Draft to use as a pilot system), one that is simpler than my original brewery, but still with enough bells and whistles to help make brew-day more efficient. And I've worked with Trevor at Alt Brew to source gluten-free grains (thanks so much Trevor!!!).
I plan on doing periodic entries in this blog about my new adventures in all-grain gluten-free brewing. I just brewed my first batch, an IPA, the style should not be a surprise for those who've ever seen my left arm, and I'm looking forward to writing about the things that I learn from each batch.
This new project has really reinvigorated my creative juices. I can't wait to make for beer for me (and my mom, who also can't do gluten) and share with you what I've learned!